🎨 Canvas
- 课程链接:
一、概念介绍
1.1 Canvas
<canvas>是一个HTML5提供的标签,我们可以将它简单理解为一个画板 / 画布,我们可以设置一个
宽 * 高 的像素矩阵,每个格子可以存储RGBA四个值 ,你可以用
JavaScript(可以理解成画笔) , 去涂、擦、改、导出 ...
1.2 逻辑尺寸&显示尺寸
使用实际的生活例子来举例:
【打印店打印海报】
你交给老板一张
300×150像素的照片,这是逻辑尺寸——文件里真实存在的格子数。老板把它冲印成
6cm × 3cm的小贴纸,还是放大成60cm × 30cm的海报?这叫显示尺寸(
CSS尺寸)。格子数没变,只是每个格子被拉伸成不同大小 → 海报看起来 “糊” 了。
而且相对应的 :
SVG:矢量图形:
SVG是基于矢量的图形格式,使用数学公式来定义图形的形状、颜色等属性。这意味着
SVG图形可以无限放大而不失真,始终保持清晰的边缘和细节。尺寸无关性:
SVG图形的显示效果不依赖于具体的像素点,而是由其定义的几何形状和属性决定。因此,
SVG图形在任何尺寸下都能保持一致的显示效果,非常适合用于需要高分辨率显示的场景,如图标、图表等。
Canvas:位图图形:
Canvas是基于像素的图形格式,它通过像素点来绘制图形。Canvas的绘制区域是一个二维的像素网格,每个像素点都有自己的颜色值。依赖像素点:
Canvas的显示效果依赖于具体的像素点,因此在放大时可能会出现模糊或锯齿状的边缘。这是因为放大时,
每个像素点被放大,导致图像质量下降。
- 这个概念了解即可,初学者不用太关注这个细节其实 ...
二、常用操作
2.1 渲染上下文
- 获取一个
2d的 "画笔" :getContext("2d") - 获取一个
3d的 "画笔" :getContext("webgl")
- 示例代码:
<body>
    <canvas id="canvas" width="800" height="800"
            style="background-color: #c1c1c1; margin: 20px auto; display: block;">
    </canvas>

    <script>
        const c = document.getElementById("canvas");	// 获取到 canvas 元素
        const ctx = c.getContext("2d"); // ctx : Context 渲染上下文 --> 拿到画笔
    </script>
</body>上面那段代码就生成了一个
800 * 800的画布,然后背景色是灰色,margin: 20px auto;设置为上下20px然后水平居中,display: block改成块级元素才能水平居中

2.2 绘制图形
2.2.1 坐标系
- 先了解一下
canvas的坐标系,也叫画布栅格(canvas grid),可能会跟我们想象的不一样:

- 在这个画布里, 左上角是坐标
(0,0), 然后水平是x 轴, 垂直是y 轴
2.2.2 绘制线段
API:- 绘制:
moveTo(x,y),lineTo(x, y),stroke(),fill() - 设置样式 :
lineWidth,strokeStyle,fillStyle - 路径:
beginPath(),closePath()
- 绘制:
- 解释:
stroke():通过线条来绘制图形轮廓fill():通过填充路径的内容区域生成实心的图形beginPath():新建一条路径,生成之后,图形绘制命令被指向到路径上生成路径。closePath():闭合路径之后图形绘制命令又重新指向到上下文中。lineWidth:笔的宽度strokeStyle / fillStyle:线 / 填充 的颜色
- 绘制一条红色的线段:
<body>
    <canvas id="canvas" width="800" height="800"
            style="background-color: #c1c1c1; margin: 20px auto; display: block;">
    </canvas>
    <script>

        const c = document.getElementById("canvas");
        const ctx = c.getContext("2d"); // ctx : Context 渲染上下文 --> 拿到画笔
        // 绘制一条红色的线段
        ctx.moveTo(10, 50);          // 画笔下笔到哪个点
        ctx.lineTo(100, 50);        // 画到哪个点
        ctx.lineWidth = 5;          // 画笔宽度
        ctx.strokeStyle = "red";    // 线条颜色
        ctx.stroke(); 				// 通过线条来绘制图形轮廓

    </script>
</body>- 效果:

- 绘制一个实心三角形:
<body>
    <canvas id="canvas" width="800" height="800"
            style="background-color: #c1c1c1; margin: 20px auto; display: block;">
    </canvas>

    <script>
        const c = document.getElementById("canvas");
        const ctx = c.getContext("2d"); // ctx : Context 渲染上下文 --> 拿到画笔

        // 绘制一个实心三角形
        ctx.moveTo(50, 50);
        ctx.lineTo(100, 75);
        ctx.lineTo(100, 25);
        ctx.fill(); // 通过填充路径的内容区域生成实心的图形

    </script>

</body>- 效果:

常见误区:不使用
beginPath()导致的错误示例代码:
<body>
    <canvas id="canvas" width="800" height="800"
            style="background-color: #c1c1c1; margin: 20px auto; display: block;">
    </canvas>

    <script>
        const c = document.getElementById("canvas");
        const ctx = c.getContext("2d"); // ctx : Context 渲染上下文 --> 拿到画笔

        // 绘制一条红色的线段
        ctx.strokeStyle= 'red';
        ctx.lineWidth = 10;
        ctx.moveTo(50, 100);
        ctx.lineTo(150, 100);
        ctx.stroke();

        // 绘制一条蓝色的线段
        ctx.strokeStyle= 'blue';
        ctx.lineWidth = 5;
        ctx.moveTo(50, 200);
        ctx.lineTo(150, 200);
        ctx.stroke();

    </script>

</body>- 效果:

解释:我们前面知道
ctx是上下文,那么它只有一个对象,我们对它进行改颜色,改宽度都是改的同一个,同时,
stroke()会把它之前的代码都执行一次,那么就导致,第一个stroke画了一个 10 宽度的红色线段,第二个
stroke画了两个宽度为 5 的蓝色线段。
总而言之,言而总之,我们需要用 beginPath() 来设置我们的新建路径
- 修改后代码:
<script>
    const c = document.getElementById("canvas");
    const ctx = c.getContext("2d"); // ctx : Context 渲染上下文 --> 拿到画笔

    // 绘制一条红色的线段
    ctx.beginPath();
    ctx.strokeStyle= 'red';
    ctx.lineWidth = 10;
    ctx.moveTo(50, 100);
    ctx.lineTo(150, 100);
    ctx.stroke();

    // 绘制一条蓝色的线段
    ctx.beginPath();
    ctx.strokeStyle= 'blue';
    ctx.lineWidth = 5;
    ctx.moveTo(50, 200);
    ctx.lineTo(150, 200);
    ctx.stroke();

</script>- 效果:(这次效果就正常了)

📌 关于 moveTo :
moveTo(x,y)叫做移动笔触, 这个函数实际上并不能画出任何东西 ,但是它在我们
beginPath()后负责把 "画笔" 接触到 "画板" 上面,这样我们才能使用
lineTo(x,y), 来画出路径。了解后我们其实也可以使用它来反复移动笔触,绘制一些
不连续的路径
2.2.3 绘制弧线
API:绘制圆弧或者圆,我们使用arc()方法。当然可以使用
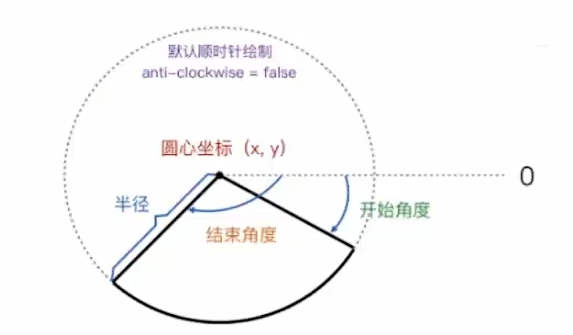
arcTo(),不过这个的实现并不是那么的可靠,所以我们这里不作介绍。arc(x, y, radius, startAngle, endAngle, anticlockwise)画一个以
(x,y)为圆心的以radius为半径的圆弧(圆),从
startAngle开始到endAngle结束,按照
anticlockwise:(默认)顺时针false,逆时针true来生成。备注:
arc()函数中表示角的单位是弧度,不是角度。角度与弧度的 js 表达式:
弧度 = ( Math.PI / 180) * 角度
- 示例代码:
<script>
const c = document.getElementById("canvas");
const ctx = c.getContext("2d"); // ctx : Context 渲染上下文 --> 拿到画笔
ctx.beginPath();
// 绘制一个以 (50,50) 为圆心, 150 为半径, 60 度的顺时针弧线
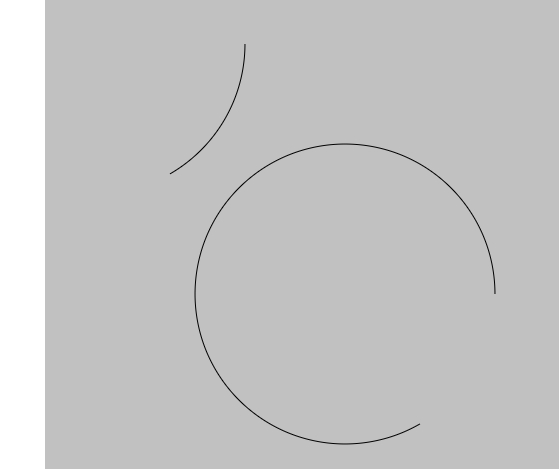
ctx.arc(50, 50, 150, 0, (Math.PI / 180) * 60);
ctx.stroke();
ctx.beginPath();
// 绘制一个以 (300,300) 为圆心, 150 为半径, 60 度的逆时针弧线
ctx.arc(300, 300, 150, 0, (Math.PI / 180) * 60, true);
ctx.stroke();
</script>- 效果:其实可以发现,这两个接起来就是一个圆,它们只改变了最后一个参数
2.2.4 绘制矩形
API:rect(x, y, width, height): 绘制一个左上角坐标为(x,y),宽高为width以及height的矩形strokeRect(x, y, width, height)=rect() + stroke()fillRect(x, y, width, height)=rect() + fill()
- 示例代码:
<script>
        const c = document.getElementById("canvas");
        const ctx = c.getContext("2d"); // ctx : Context 渲染上下文 --> 拿到画笔

        ctx.beginPath();
        // ctx.rect(50, 50, 200, 100);
        // ctx.stroke();
        // 1. 左上角为(50,50), 宽200高100的矩形轮廓
        ctx.strokeRect(50, 50, 200, 100); // 等价于上面两句代码
        // 2. 左上角为 (200,300), 宽150高100的实心矩形
        ctx.fillRect(200,300,150,100);

</script>- 效果:
